Adobe Lightroom is a powerful tool for photographers, allowing for extensive control over image editing and organization. One of Lightroom’s standout features is its ability to create and use presets. Presets are predefined settings that can be applied to photos to achieve a certain look or style quickly. In this ultimate guide, we’ll delve deep into creating, managing, and using Lightroom presets, ensuring you can streamline your workflow and enhance your photography skills.
Lightroom presets are a set of pre-configured settings that you can apply to your photos with a single click. These settings can include adjustments to exposure, contrast, color balance, sharpness, and more. Presets are especially useful for maintaining a consistent look across a series of photos or for speeding up your editing process by automating repetitive tasks.
- Consistency: Using presets ensures that your photos have a uniform look and feel, which is essential for branding and professional presentations.
- Efficiency: Applying a preset can save you a significant amount of time compared to manually adjusting settings for each photo.
- Creativity: Presets can inspire creativity by providing new looks and styles that you might not have thought of on your own.
- Learning: Analyzing presets created by others can help you understand different editing techniques and improve your skills.
Setting Up Your Workspace
Before diving into preset creation, ensure your Lightroom workspace is organized:
- Import Photos: Start by importing the photos you want to edit.
- Develop Module: Navigate to the Develop module where you’ll make your adjustments.
- Create Collections: Organize your photos into collections for easy access and management.
Basic Adjustments
To create an effective preset, begin with basic adjustments:
- Exposure: Adjust the exposure to correct the overall brightness of your image.
- Contrast: Increase or decrease contrast to enhance the separation between light and dark areas.
- White Balance: Correct the color temperature and tint to ensure accurate colors.
- Highlights and Shadows: Adjust highlights to recover details in bright areas and shadows to bring out details in darker regions.
- Clarity, Vibrance, and Saturation: Fine-tune these settings to enhance midtone contrast, increase the intensity of muted colors, and adjust overall color intensity.
Advanced Adjustments
For a more polished preset, delve into advanced adjustments:
- Tone Curve: Use the tone curve for precise control over tonal range and contrast.
- HSL/Color Panel: Adjust the hue, saturation, and luminance of specific colors to achieve the desired look.
- Split Toning: Apply different colors to the highlights and shadows for a creative effect.
- Detail Panel: Sharpen your image and reduce noise to enhance clarity and definition.
- Lens Corrections: Correct lens distortions and remove chromatic aberration for cleaner images.
- Effects: Add a vignette or grain for a vintage or dramatic effect.
Creating Your First Lightroom Preset
Step-by-Step Guide
- Make Your Adjustments: Apply the desired adjustments to your photo in the Develop module.
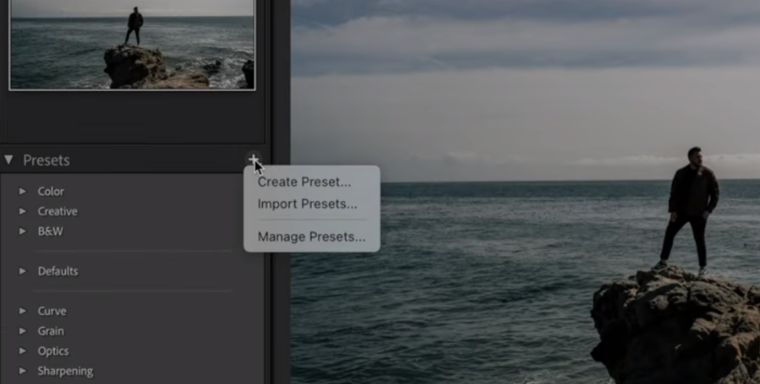
- Save Preset: Once you’re satisfied with your adjustments, go to the Develop module’s left panel, click the “+” icon in the Presets section, and select “Create Preset.”
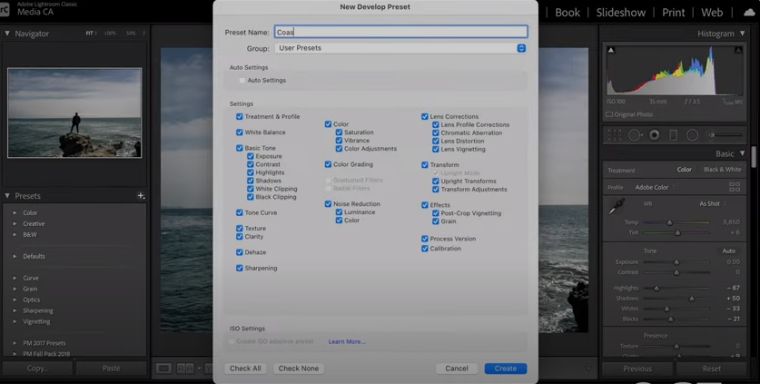
- Name Your Preset: Give your preset a descriptive name that reflects its style or purpose.
- Select Settings: Choose which settings to include in the preset. You can select all or specific adjustments.
- Create Preset: Click “Create” to save your new preset. It will now appear in the Presets panel for easy access.
Testing Your Preset
After creating your preset, it’s crucial to test it on various photos to ensure it works well across different lighting conditions and subjects. Make any necessary tweaks and update your preset accordingly.
Organizing and Managing Presets
Preset Folders
To keep your presets organized, create preset folders:
- Create Folder: Right-click in the Presets panel and select “New Folder.”
- Name Folder: Give your folder a relevant name, such as “Portraits” or “Landscapes.”
- Move Presets: Drag and drop your presets into the appropriate folders.
Updating Presets
If you make changes to a preset and want to save the updated version:
- Update with Current Settings: Right-click on the preset and select “Update with Current Settings.”
- Modify Settings: Adjust the settings as needed and click “Update.”
Sharing Presets
Sharing your presets with others can be a great way to connect with the photography community or build your brand:
- Export Preset: Right-click on the preset and select “Export.”
- Save File: Choose a location to save the .xmp file, which you can then share.
Advanced Preset Techniques
Creating Specialized Presets
Consider creating presets for specific scenarios:
- Black and White: Focus on contrast, texture, and tone for striking monochrome images.
- Portraits: Enhance skin tones, soften textures, and add subtle vignettes for flattering portraits.
- Landscapes: Boost vibrance, enhance details, and adjust the tone curve for dramatic landscape shots.
Stacking Presets
You can apply multiple presets to a single photo by stacking them:
- Apply Base Preset: Start with a base preset that makes broad adjustments.
- Apply Secondary Preset: Add a second preset to fine-tune specific aspects.
- Fine-Tune Adjustments: Manually adjust settings to blend the effects seamlessly.
Creating Adaptive Presets
Lightroom’s AI-powered adaptive presets can automatically adjust based on the photo’s content:
- Select Adaptive Preset: Choose from Lightroom’s built-in adaptive presets, such as those for portraits or landscapes.
- Create Custom Adaptive Preset: Customize an adaptive preset and save it for future use.
Best Practices for Using Presets
Consistency is Key
Using presets consistently helps maintain a cohesive look across your portfolio or social media feed. This is especially important for branding purposes.
Customize to Suit Each Photo
While presets provide a great starting point, always customize them to suit each individual photo. Adjust exposure, white balance, and other settings as needed.
Keep Learning and Experimenting
The world of photo editing is ever-evolving. Keep learning new techniques, experimenting with different styles, and updating your presets to stay current.
Pros
Time-Saving Efficiency
Presets enable you to make complex editing changes to your images with just a few clicks, saving you a lot of time and energy. Whether you’re editing a single photo or a collection of images, presets can significantly reduce your editing time and allow you to spend more time shooting and being creative.
Consistency Across Your Portfolio
By using the same preset on multiple images, you can create a consistent look and feel throughout your portfolio. This consistency helps you establish your style as a professional photographer and create an eye-catching portfolio that speaks to your audience.
Inspiration and Exploration
In addition to being a practical tool for editing, presets can also be a source of inspiration. Experimenting with different presets allows you to experiment with different editing styles, different editing techniques, and creative options that you might not have thought of before. Presets can inspire creativity and help you to think differently in your editing process.
Learning and Education
Studying and analyzing other photographers’ presets can be a great way to learn more about the art and science behind photo editing. Studying how different presets achieve different looks and effects can help you hone your editing skills and fine-tune your own presets.
Workflow Optimization
Presets help you work faster and easier by giving you a structure to your edits. You don’t have to start from scratch every time you edit a photo. Instead, you can use a preset that matches the look you’re going for and then tweak the settings to match the unique features of your image.
Cons
Lack of Customization
While presets are a great way to get started, they don’t always give you the results you’re looking for. Each photo is different and presets aren’t the same for everyone. This means you may need to make a few more adjustments to get the look you’re going for, which can take away from some of the other time-saving features of presets.
Overdependence on Presets
Over-reliance on presets can hold you back from developing your skills as a photographer and limit your creative freedom. If you get too used to using presets, you may lose sight of the fact that learning basic editing skills and developing your unique editing style is more important than ever. It’s important to find a balance between relying on presets and developing your editing skills on your own.
Risk of Overediting
Some presets can be too aggressive in their edits, resulting in unnatural-looking edits. This can damage the authenticity and quality of your photos. Be careful when using presets and don’t make too many heavy-handed edits, which can lead to loss of detail or image distortion. Always balance enhancing your photos with preserving their integrity.
Limited Flexibility
While lightroom’s presets provide some degree of flexibility, they are by definition set in stone. If you have an idea for your photo that drastically differs from the presets available to you, you may not be able to get the result you want with presets alone. In this case, you may need to manually edit your photo to achieve your creative vision.
How do I install presets in Lightroom?
To install presets, open Lightroom, navigate to the Develop module click on the “+” icon beside the Presets panel, then select “Import Presets” and select the preset files that you want to install.
Can I use presets on mobile devices?
Yes, Lightroom mobile supports presets. You can sync your presets across devices using Adobe Creative Cloud.
Are presets customizable?
Yes, you can adjust the settings of presets to suit your individual photos and style.
Can I create my own presets?
Absolutely! Lightroom allows you to create custom presets based on your editing preferences.
Do presets work with all types of photos?
While presets can work well with many types of photos, they may require some adjustments depending on factors like lighting and subject matter.
Are presets suitable for professional photographers?
Yes, many professional photographers use presets to streamline their workflow and maintain consistency across their portfolios.
How do I organize my preset library?
You can organize your presets into folders within the Presets panel in Lightroom.
Can I share my presets with others?
Yes, you can export your presets and share them with friends, clients, or other photographers.
Do presets affect the quality of my photos?
Presets are non-destructive and will not degrade the quality of your photos.
Creating presets in Lightroom is a powerful way to enhance your photo editing workflow. By understanding the basics, experimenting with advanced techniques, and organizing your presets effectively, you can produce consistent, professional-quality images with ease. Whether you’re a seasoned photographer or just starting, this ultimate guide provides you with the tools and knowledge to master Lightroom presets and elevate your photography to new heights.