Adobe Lightroom provides many useful features that fulfill the demands of both beginners and experienced image editors. We will discuss how to export photos from Lightroom while preserving their high quality and resolution for websites, Instagram, and other platforms in this article. Along with this, we’ll talk about file settings including color spacing, watermarks, metadata, and image size.
When exporting images from Adobe Lightroom for Instagram, there are several things to keep in mind to ensure that the pictures look awesome on the app.
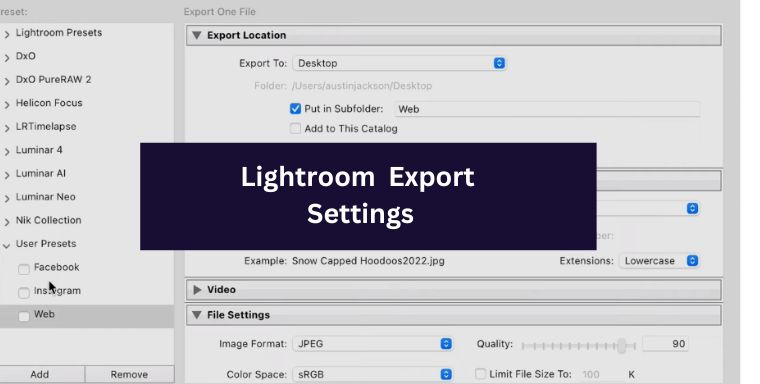
To set up export settings in Lightroom:
- Select the image you want to export
- Select file>export or press the keyword shortcut key Ctrl+shift+E (Cmd+shift+E on Mac)
- Select the target folder for exported photos in the export dialogue box.
- Set the file settings to JPEG, color space to sRGB, and resolution to 72 ppi.
- Adjust the quality according to your desired level(80-85 is recommended)
- Apply sharpening if you’d like to.
- Keep the default metadata settings.
- You can also apply a watermark if you want to.
- Click export to save the image according to your specified settings.

By following all these steps your images will be optimized for further sharing on Instagram.
Valuable Tip for You
You can also apply noise or grain to your photos to preserve their details and textures, and you can then upload them to Instagram. For this, go to the detail panel in the Develop module and then adjust the noise reduction sliders according to your preferences, and if desired, move to the effects panel to adjust the grain slider to add a grain effect to your image.
To export your images for high-resolution Print you should follow these steps:
- Choose the image you want to export
- You can choose TIFF or JPEG as the file format.
- Set the color space to ProPhoto RGB.
- Maintain resolution at 300 pixels per inch.
- You can adjust the dimensions of the image according to your desired print size.
- Apply appropriate output sharpening( Matte or Glossy is (recommended)
- Add any desirable metadata.
- You can also add a watermark to the image.
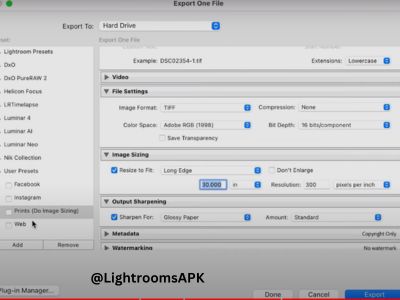
All these steps will help you minimize quality loss and optimize your images for high-resolution print.
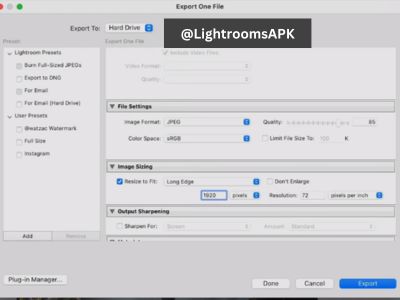
- Select the image you want to export.
- Select the standard JPEG format and quality at 87%.
- Set the color space to sRGB.
- For image sizing set the long edge at 2048 pixels and resolution at 72ppi.
- Adjust the sharpening according to your preference.
- Include metadata for copyright issues.
- You can check the watermark box for applying the watermark.
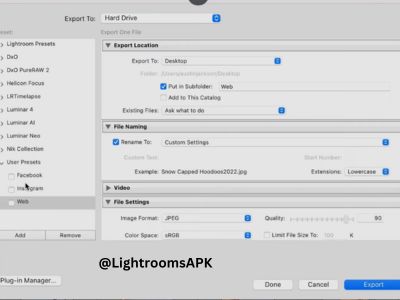
By following these guidelines your images will look great and load quickly and improve the online viewing experience of your audience.
Lightroom file settings
Exporting the file from Lightroom does not only mean saving an image file; the file setting process can impact the quality and compatibility of your images.
Choosing the Right Format
While choosing the file format for exporting we consider the following three factors:
Intended Use:
Before formatting a file, you have to determine for what purposes you are going to use that file: for online sharing, printing, etc.
Desired Image Quality:
You have to consider the level of image quality you need for your specific purpose. If you need an image for printing, TIFF is a great option.
Compatibility across Platforms:
You have to make sure that the format chosen is compatible with the platform you are going to share your work on.
JPEG (Joint Photographic Experts Group):
- This format is ideal for sharing online on social media and for general use.
- JPEG files are compressed which results in gradually smaller file sizes while maintaining decent file quality.
- Generally Compatible with all social media platforms like Facebook, X( previously Twitter), etc.
- JPEG format supports various color spaces.
TIFF (Tagged Image File Format):
- This format is best for taking out higher-quality prints.
- TIFF files are of larger size which means this format retains all the image data preserving details.
- TIFF allows multiple layers so it is ideal for complex graphics.
- TiFF format is compatible with various professional editing software like Photoshop, lightroom, etc.
DNG( Digital Negative format)
- This format preserves original image data for flexible editing.
- DNG can utilize hardware for faster processing.
- Supports updates while maintaining compatibility.
- DNG is suitable for photographers due to its support for high-resolution images.
Image Quality Settings
Managing image quality settings during export is necessary for achieving the desired accuracy of images.
Here’s what you need to know:
Compression Levels
When you adjust the quality setting for JPEG compression, you are essentially choosing how much detail gets removed to make the file size smaller. When you make higher quality settings from 95-100 it preserves more data but the file size becomes larger. When you choose lower settings you compromise on quality but can have a small file size.
Recommendations for different Platforms
You should adjust the quality setting from 80 to 85 for JPEG’s. By doing so, you can smoothly share your images on social media platforms.
For taking out a high-quality print, a 100% quality setting is recommended.
“Limit File Size To” Option:
Lightroom offers a limited file size option, which can help you specify your image size. These are some common platform limitations you should keep in mind:
- Instagram allows a maximum file size of 30 MB.
- For Facebook, I recommend a file size under 15 MB.
- For Twitter, under 5MB is recommended.
- For Pinterest, 15MB is recommended.
- For Wix, your file size should not exceed 25 MB.
Color Space Settings
If you are going to share images on social media platforms like Instagram, Twitter, Facebook, or websites, then I recommend sRGB color space because the colors appear consistent and predictable across different devices.
If you are preparing your images for printing, then I recommend the Adobe RGB color space because of its larger color space and ability to retain more color detail.
Recommended Image Sizing
Here are the following image sizes according to various platforms.
Facebook:
- Image Post: 1200*630 Pixels.
- Cover Image: 820*312 Pixels.
- Event Image: 1920*1080 Pixels.
Pinterest:
- Broad Cover: 600*600
- Pin Image: The optimal Width is 1000 height can vary but longer images are often favoured.
Twitter(X):
- Image Post: 1200*675 Pixels.
- Header Photo: 1500*500 Pixels.
Instagram:
- Landscape: 1080*566 Pixels.
- Portrait: 1080*1350 Pixels.
- Square Image: 1080*1080
Watermarking
In Lightroom, you can add a signature or logo to your images with the help of the “watermark section” in the export dialogue box. This can help promote your brand and get recognized for your work by sharing it on different platforms. It asserts your ownership of the images and makes them look professional.
Metadata
Metadata is basically the information embedded in the digital file that provides details about files, such as resolution, file format, etc. It also includes copyright information and keywords describing the content of the image. You can add authorship details through metadata. It’s your choice whether to add metadata to your images, but for normal sharing on social media platforms, it’s not necessary.
Conclusion
These export settings will make your photos look great on social media platforms like Instagram, Facebook, Twitter, and websites. These settings will help you professionally optimize your images and make sure you do not lose any quality while exporting your work. In short, next time you are ready to export these photos, just remember these steps to make sure they shine!